The Ultimate Guide to Padel Court Artificial Grass Installation: Expert Procedures & Precautions

When building a premium padel court, selecting top-tier, shrink-resistant artificial turf is only half the battle. In international court construction standards, there is a golden rule: “30% relies on the material, 70% relies on the installation.”
When courts experience turf bubbling, seam splitting, or massive shrinkage just months after completion, it is rarely a defect in the grass itself. Instead, it is usually the result of poor temperature/humidity control, ignored stress-release protocols, or improper gluing techniques during installation.
For international buyers, contractors, and facility operators, ensuring a flawless installation is critical. Below is a comprehensive, step-by-step guide to padel court turf installation, combining international tournament standards with frontline construction expertise.

Part 1: Three Essential Pre-Installation Prerequisites

Before rolling out the turf, you must eliminate potential risks from the environment and the sub-base. This is the absolute prerequisite for preventing future bubbling and deformation.
✔Strict Temperature & Humidity Limits 
Never install turf in the rain or when relative humidity exceeds 85%. The optimal ambient temperature for installation is between 15°C and 30°C. Temperatures that are too low will cause the turf backing to stiffen and slow down the curing of the two-component PU adhesive. Temperatures that are too high will cause the adhesive to dry too quickly, losing its bonding strength—a primary culprit for future bubbling.

✔Sub-Base Flatness & Drainage Slope 
Whether using a concrete or porous asphalt base, the surface flatness must have a deviation of less than 3mm under a 3-meter straight edge. Because padel courts are enclosed structures (surrounded by panoramic glass and mesh panels), a proper drainage slope (typically a 0.5% – 1% turtle-back or single-direction slope) is mandatory. A water ponding test should be conducted before laying the grass.

✔Mandatory “Stress Relaxation” 
Artificial grass is tightly rolled during manufacturing and global shipping, creating significant mechanical tension inside the backing. Before installation, the turf rolls must be fully unrolled on the court and left to rest under the sun for at least 24 hours. This allows the turf to naturally expand and acclimatize to the local temperature. Cutting and gluing immediately without this step guarantees severe physical shrinkage when temperatures fluctuate later.

Part 2: Standard Step-by-Step Installation Process

Step 1: Sub-Base Preparation & Marking 
Thoroughly clean the base, ensuring there are no stones, dust, or oil stains. Once the base is completely dry, use a theodolite and steel measuring tape to snap the reference and boundary lines for the standard padel court dimensions (20m × 10m).

Step 2: Turf Positioning & Alignment 
Unroll the relaxed turf rolls sequentially according to the installation plan. Crucial detail: The pile direction (the natural lean of the grass blades) of all rolls must face the exact same direction. If the direction is mixed, the court will show severe color inconsistencies under sunlight. Adjacent turf rolls should overlap by 2cm – 3cm.

Step 3: Precision Seam Cutting 
Use a professional turf cutter or a sharp utility knife to trim the overlapping edges, ensuring the two rolls butt together perfectly (the gap must be kept within 1mm – 2mm). Place a 20cm – 30cm wide non-woven seaming tape directly centered underneath the joint.

Close-up of precision seam cutting during padel turf installation, using a straight edge and cutter on blue artificial grass.

Step 4: Professional Gluing & Pressing 
Apply a high-strength, two-component PU (polyurethane) artificial grass adhesive evenly onto the seaming tape. Never pour the adhesive directly onto the tape. Use a notched trowel to spread it evenly to a thickness of 1.5mm – 2mm. Wait until the adhesive becomes slightly tacky (it should not string when touched), then carefully bring the two edges of the turf together. Installers must walk along the seam to press it down, or use a heavy roller to ensure the turf backing fully bites into the adhesive and all air is expelled.

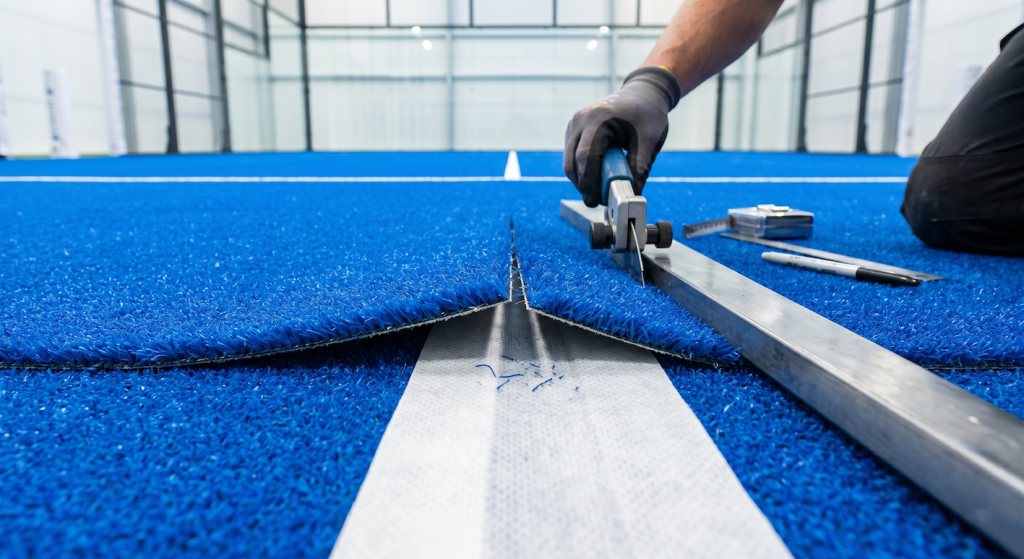
Step 5: Functional Line (White Line) Inlaying 
The white lines for a padel court (service lines, center line) usually require on-site cutting and inlaying. On the perfectly joined green or blue turf, mark the standard dimensions and use a double-bladed line cutter to create a 5cm wide trench. Insert the seaming tape, apply the PU adhesive, and precisely lay the pre-cut white turf strips into the trench, rolling them flat.

Step 6: Silica Sand Infill & Brushing 
Allow the PU adhesive to cure for at least 24 hours before applying the sand infill. Padel courts strictly require 0.4mm – 0.8mm rounded, washed silica sand. (Never use sharp river sand, as it will slice the grass fibers). The sand must be applied in 3 to 4 separate layers. After spreading each layer evenly with a professional drop spreader, immediately use a power brush machine to brush against the pile direction. This forces the sand deep into the base of the fibers. The final standard is to leave approximately 1.5mm – 2mm of the grass fibers exposed above the sand, ensuring consistent ball rebound and safe player sliding.

Part 3: Advanced Quality Control for High-Frequency Commercial Use

To ensure the court can withstand high-frequency commercial operations and complex outdoor climates (such as heavy wind loads in coastal areas), professional installation teams must focus on the following final details:
Reinforced Edge Anchoring: Because padel courts are surrounded by 12mm tempered glass and heavy metal mesh, the edges of the turf are prone to accumulating water and dust. Aside from full gluing at the perimeters, it is highly recommended to use expansion bolts and wind-resistant pressure strips where the turf meets the net posts and glass pillars. This prevents high winds from lifting the court edges.
Infill Consistency & Rebound Testing: Uneven sand infill directly leads to inconsistent ball speeds. A premium installation finishes with a multi-point tennis ball rebound test across all zones of the court. The variation in bounce height should strictly remain under 5%.

By strictly adhering to these installation guidelines, facility developers and international buyers can eliminate the chronic issues of turf bubbling and shrinkage, maximize the lifespan of their investment, and deliver a world-class playing experience that meets the highest professional standards.

Two workers installing blue artificial turf for an indoor padel court.

error: Content is protected !!